▶ Intro Demo
Rendering Settings
I began by configuring Unreal Engine’s rendering settings. Since I didn’t need dynamic global illumination, I disabled Lumen and opted for fully baked lighting instead. I also turned off Lumen Reflections in favor of Spherical Reflection Probes, and increased the Reflection Capture Resolution to 1024 for sharper, higher-fidelity reflections. I disabled Mesh Distance Field generation as I wasn’t using DFAO, and turned off Nanite due to my use of traditional low-poly meshes.
Post Processing & Forward Rendering
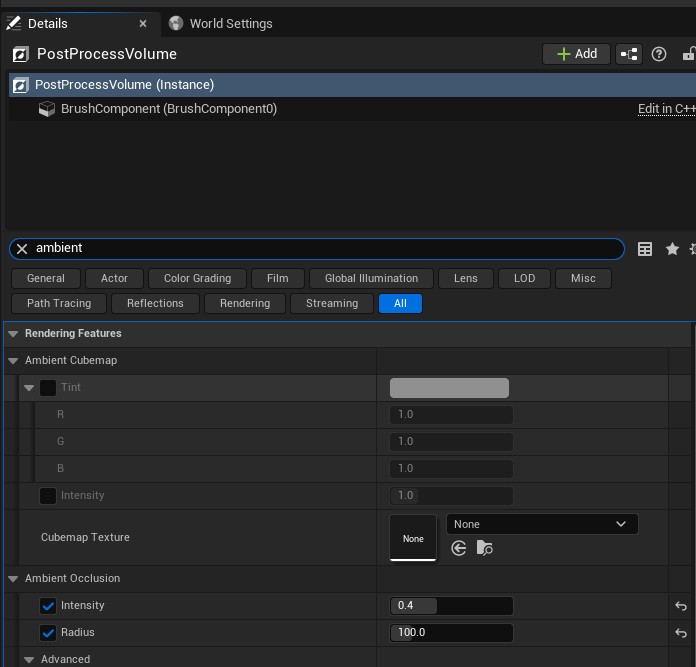
Most post-processing effects were disabled, including Motion Blur, Lens Flares, Chromatic Aberration, Depth of Field, and Film Grain since I prefer a cleaner look. I also switched the rendering path from Deferred to Forward+ (Forward Shading), which enables MSAA for crisper visuals and is generally more performant (why it is recommended for VR). Although Forward+ lacks the G-Buffer and some screen-space effects, Unreal Engine 5 supports SSAO in forward mode, which I made use of. I added a Post Process Volume (set to Infinite Extent), disabled auto-exposure, and manually increased the exposure compensation to achieve a balanced look.
Lighting Workflow
To bake lighting effectively, I enabled the HDRI Backdrop plugin and added a high-resolution HDRI for ambient light. I set the HDRI intensity to 2 for baking, then reduced it to 0.4 during gameplay for subtlety. I enclosed the playable area in a Lightmass Importance Volume and placed Lightmass Portals at windows to better guide indirect light. Commonly rectangular lights are also added on windows for direct illumination, but I found my scene looked better without them. Additional Point Lights were placed in the living room with a color temperature of 4500K to provide a warm, cozy feel.
Reflection Captures
I used multiple Sphere Reflection Capture actors, placing one at the center of each room and smaller ones near reflective objects. Spheres gave better results than boxes, which is also aligned with Unreal’s recommendations.
Mesh Import & Lightmap Setup
While importing meshes, I made sure to generate Lightmap UVs and disabled Nanite. I adjusted lightmap resolution from 64 to 512 depending on object size. The Lightmap Density view mode proved invaluable for checking resolution balance across objects.
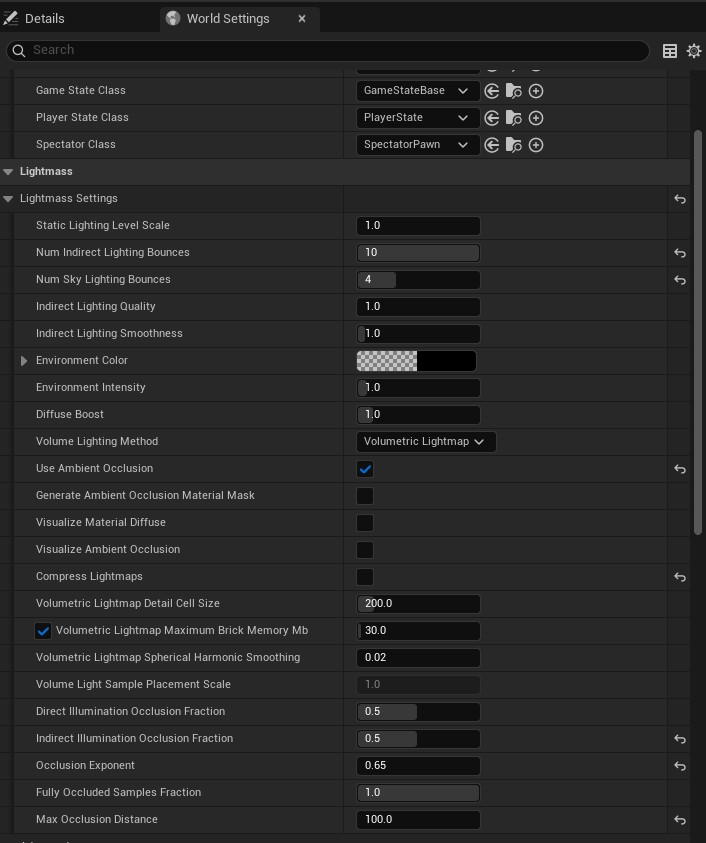
Lightmass & SSAO Settings
I tuned the Lightmass Settings under World Settings for high-quality bakes and ambient occlusion, which I paired with SSAO via the post process volume.
Gameplay & Interaction
I created a custom interactable interface and had all relevant Blueprint actors implement it. I also developed a basic first-person character controller, and layered in audio through background music and sound cues to enhance immersion.